Introduction
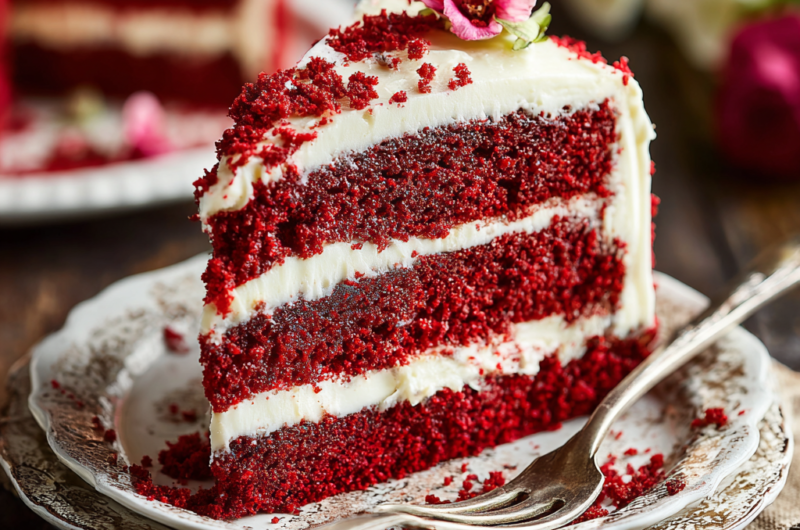
Red Velvet Cake is a delightful dessert that combines a rich, velvety texture with a hint of chocolate and a stunning crimson hue. Its unique flavor and eye-catching appearance make it a favorite choice for celebrations and special occasions.
Traditionally, this cake is served with a creamy cream cheese frosting, which perfectly balances the cake's sweetness and adds an irresistible tang. Baking a Red Velvet Cake at home allows you to appreciate the process while creating something truly impressive.
Ingredients
- 2 1/2 cups all-purpose flour
All-purpose flour acts as the foundation of the cake, providing structure and stability. Its gluten content helps trap air during mixing, leading to a light and fluffy final product. - 1 1/2 cups granulated sugar
Sugar not only sweetens the cake but also contributes to its moistness and tenderness. It's essential for achieving that perfect crumb texture and aids in browning during baking. - 1 teaspoon baking soda
Baking soda is a leavening agent that reacts with acidic ingredients to create carbon dioxide, helping the cake rise. It ensures a fluffy texture and lightness in every bite. - 1 teaspoon salt
Salt enhances the flavors in the cake, balancing the sweetness and allowing other ingredients to shine. It also plays a role in strengthening the dough. - 1 tablespoon unsweetened cocoa powder
Cocoa powder adds depth to the flavor of the cake without overwhelming the signature taste of Red Velvet. In moderate amounts, it enhances the color and contributes subtle chocolate undertones. - 1 1/2 cups vegetable oil
The oil brings moisture to the cake, ensuring that it remains soft and tender. It gives the cake a velvety mouthfeel and helps in maintaining freshness over time. - 1 cup buttermilk
Buttermilk adds acidity, which activates baking soda, promoting leavening. It also enriches the cake's flavor and contributes to its moistness. - 2 large eggs
Eggs are crucial for structure and stability, providing the cake with a rich flavor and ensuring it holds together well. They contribute to the rise and overall texture as well. - 1 teaspoon vanilla extract
Vanilla extract adds warmth and depth to the cake's flavor profile, enhancing the overall taste experience and balancing the chocolate and sweetness. - 1 tablespoon red food coloring
The vibrant red food coloring is what gives the cake its signature appearance. It enhances the visual appeal of the cake, making it a standout dessert. - 8 oz cream cheese, softened
Cream cheese is the primary ingredient in the frosting, lending a rich and tangy flavor. Its smooth texture creates a luxurious coating that complements the cake. - 4 cups powdered sugar
Powdered sugar sweetens the frosting while giving it a light, fluffy texture. It dissolves easily, creating a smooth finish that spreads beautifully on the cake. - 1/2 cup unsalted butter, softened
Butter adds richness and a silky texture to the frosting. It also helps achieve a stable consistency that can withstand spreading and decorating.
Directions & Preparation
Step 1: Preheat your oven to 350°F (175°C).
Preheating the oven is a crucial first step in baking as it ensures that the cake starts cooking immediately upon being placed inside. This helps maintain the desired texture and rise of the cake.
Step 2: Prepare your baking pans by greasing and flouring two 9-inch round cake pans.
Greasing and flouring the pans prevent the cake from sticking, allowing for easy removal once baked. It's advisable to use parchment paper on the bottom for added insurance against sticking.
Step 3: In a large mixing bowl, sift together the flour, baking soda, salt, and cocoa powder.
Sifting combines the dry ingredients thoroughly while also aerating them, which contributes to a lighter texture in the final cake. This step helps avoid lumps and ensures even distribution of leavening agents.
Step 4: In another bowl, mix the vegetable oil, granulated sugar, eggs, buttermilk, vanilla, and red food coloring until well combined.
Mixing wet ingredients together ensures that the sugar dissolves and blends with the oils, reducing graininess. The reaction between the acid in buttermilk and baking soda also starts at this stage, contributing to the cake's rise.
Step 5: Gradually add the dry ingredients to the wet ingredients, mixing until just combined.
Overmixing can develop gluten in the flour, leading to a dense cake rather than a light, tender one. Mixing just until combined helps retain that desired texture.
Step 6: Divide the batter equally between the prepared pans and smooth the tops.
Dividing the batter evenly ensures that the cakes bake uniformly and at the same rate. Smoothing the tops also helps them rise evenly and results in flat, level layers.
Step 7: Bake in the preheated oven for 25-30 minutes, or until a toothpick inserted comes out clean.
Baking times can vary based on the oven and type of pans used. Monitoring the cakes towards the end of the baking time is essential to prevent overbaking, which can lead to dryness.
Step 8: Allow the cakes to cool in the pans for 10 minutes before transferring them to a wire rack.
Cooling in the pans helps the cakes stabilize and makes them easier to handle. Transferring to a wire rack allows the cakes to cool completely and prevents sogginess.
Step 9: While the cakes cool, prepare the cream cheese frosting by beating together the softened cream cheese, butter, and powdered sugar until smooth and fluffy.
Creaming together the frosting ingredients fully incorporates air, giving it a light, fluffy texture. This step is essential for achieving a smooth and spreadable frosting.
Step 10: Once the cakes are cooled, place one layer on a serving plate and spread a layer of frosting on top.
This step adds stability and moisture to the cake while providing a delightful taste contrast. Layering creates texture and richness, making each bite pleasurable.
Step 11: Carefully place the second cake on top and frost the top and sides of the cake evenly.
Frosting the top and sides not only enhances the cake's visual appeal but also seals in moisture. A smooth application of frosting creates a professional finish.
Step 12: Chill the frosted cake for about 30 minutes to set the frosting before serving.
Chilling helps the frosting firm up slightly, making it easier to slice. This waiting period ensures that every piece served maintains its shape and looks beautiful.

The Vibrant History of Red Velvet Cake
Red Velvet Cake has a rich history that dates back to the early 20th century, often linked to the lavish cakes of the Southern United States. Originally a product of the chemical reactions from using cocoa, buttermilk, and vinegar, the cake's signature red color was further emphasized with the addition of red food coloring in modern recipes, making it a staple at celebrations.
Perfecting the Cream Cheese Frosting
Cream cheese frosting is vital to the Red Velvet experience, offering a tangy contrast to the sweet cake. When making the frosting, it's crucial to ensure both the butter and cream cheese are at room temperature. This allows for easy mixing, which results in a creamy, uniform texture that spreads beautifully over the cake.
Celebration and Serving Suggestions
Red Velvet Cake holds its place as a showstopper at parties, weddings, and holiday gatherings. It pairs wonderfully with a glass of cold milk or a cup of coffee, and garnishing it with fresh berries or white chocolate shavings can elevate its presentation. Consider adding a personal touch with custom decorations for special events.
FAQs
What if my batter seems too thick?
If the batter appears thicker than expected, gradually add a tablespoon of buttermilk to loosen it. This will achieve the desired consistency while maintaining the cake's moistness.
Can I use a different frosting for my Red Velvet Cake?
Yes, while cream cheese frosting is traditional, options like a vanilla buttercream or whipped cream can also complement the cake's flavor. Just ensure the frosting is stable for layering.
What happens if my cake turns out dry?
A dry Red Velvet Cake could result from overbaking or not enough moisture in the ingredients. To remedy this, check the bake time and ensure you measure your liquids accurately.
Is it possible to make mini Red Velvet Cakes?
Definitely! You can use a cupcake tin or mini cake pans. Adjust baking times accordingly, usually reducing to 15-20 minutes for small cakes.
Why did my cake sink in the middle?
A sinking cake can happen due to underbaking or overmixed batter. Ensure your oven temperature is accurate and avoid overmixing after adding the dry ingredients.
Can I replace the vegetable oil with another fat?
You can use melted butter instead of vegetable oil, but the texture will differ slightly. The cake may become richer but slightly less moist.
Conclusion
Baking a Red Velvet Cake at home allows you to bring a classic dessert into your repertoire, one that can be enjoyed at any celebration. Its striking appearance combined with its delightful flavor makes it an unforgettable treat.
Experimenting with different frostings and decorations can personalize your cake even more. Embrace the process, and enjoy the sweet, velvety success of your own homemade Red Velvet Cake.
Recipe Card

A Classic Approach to Red Velvet Cake Baking
Ingredients
Method
- Preheat your oven to 350°F (175°C).
- Prepare your baking pans by greasing and flouring two 9-inch round cake pans.
- In a large mixing bowl, sift together the flour, baking soda, salt, and cocoa powder.
- In another bowl, mix the vegetable oil, granulated sugar, eggs, buttermilk, vanilla, and red food coloring until well combined.
- Gradually add the dry ingredients to the wet ingredients, mixing until just combined.
- Divide the batter equally between the prepared pans and smooth the tops.
- Bake in the preheated oven for 25-30 minutes, or until a toothpick inserted comes out clean.
- Allow the cakes to cool in the pans for 10 minutes before transferring them to a wire rack.
- While the cakes cool, prepare the cream cheese frosting by beating together the softened cream cheese, butter, and powdered sugar until smooth and fluffy.
- Once the cakes are cooled, place one layer on a serving plate and spread a layer of frosting on top.
- Carefully place the second cake on top and frost the top and sides of the cake evenly.
- Chill the frosted cake for about 30 minutes to set the frosting before serving.
Notes
Additional serving suggestions: pair with a crisp salad, garlic bread, or roasted seasonal vegetables for balance.
For make-ahead, prep components separately and assemble just before heating to preserve texture.
Taste and adjust with acid (lemon/vinegar) and salt right at the end to wake up flavors.